Will's birthday was last Wednesday, so I woke up bright and early to prepare him a lovely breakfast in bed, and also to make him a super fun bento :)
DIY: How to Breakfast! Baked Eggs with Bunny Toast
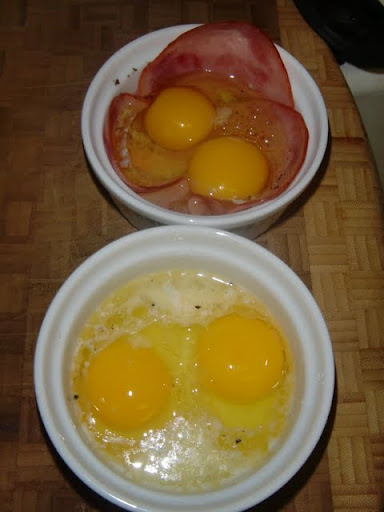
1) Get two ramekins, and put in about 1/2 a tblspoon of butter and 1 tablespoon of milk or cream in each/ put in the broiler and let melt. Take ramekins out of broiler. Then, place 2 eggs in each. If you're a ham lover, put in 2 pieces of lunch meat ham at the bottom of the ramekin before putting in the egg. Add a bit of salt and pepper.
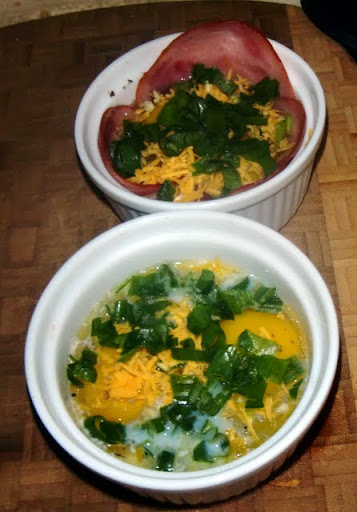
2) Top the eggs with your choice of thyme, rosemary, oregano, cheese (I used mild cheddar), and lots of green onion. Place the ramekins back in the broiler for 15 to 25 minutes, until yolks are slightly firm
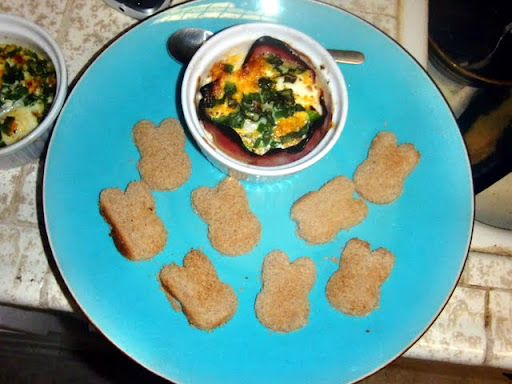
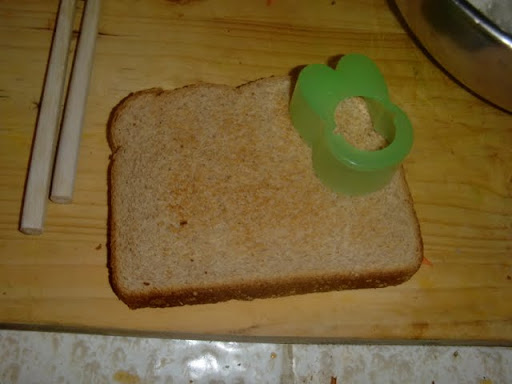
3) While ramekins are in the broiler, toast some bread. You can take any shape cookie cutter to make cute shapes once the toast is ready. I made some small bunny bread bites!
4) When eggs are done, take out of broiler, and let sit for 3 minutes. Place on a plate with the toast bites, and service! ta da!

DIY: 愛の弁当の作り方! How to Ai no Bento! (Love Bento!)
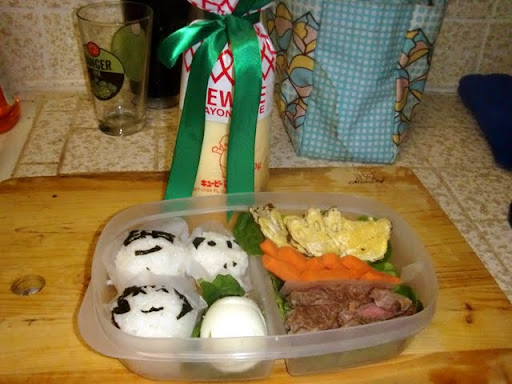
1) Steal flat-ish tupperware from roommate. Hope he doesn't notice. Line one side with lettuce or spinach. For the other side, I prepped "containers" for the onigiri using round pieces of wax paper that I taped the sides up of. You can also use cupcake papers for this, I was just too cheap to buy them hehe.

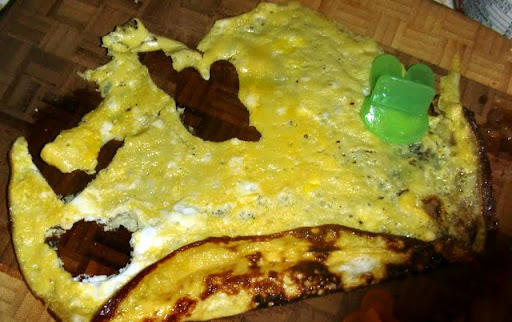
2) Prepare omelette: I made Japanese-style sweet omlettes, which is simply 1 egg, 1 tablespoon of dashi, and 2 teaspoons of sugar whipped up and put into a pan. Usually sweet omlettes are rolled, but to make shapes, I kept it flat. (Right around this time, the broiler had set off the fire alarm, so while I was running around trying to turn it off, the eggs has cooked flat anyway haha). When soft and firm, take out of pan and place on cutting board to let cool for about 3 minutes. Then, I used bunny bread press molds and pressed bunny and bear shapes into the omlette. (yours shouldn't be QUITE as burny as this one..)
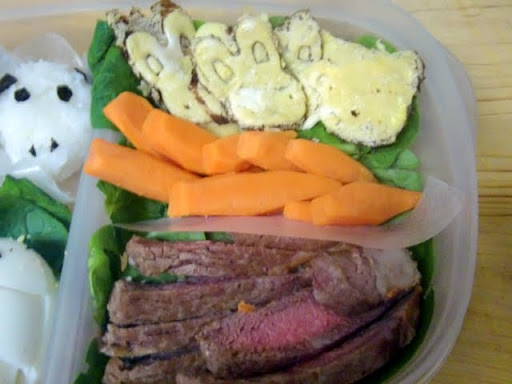
3) I had grilled some beef tenderloin the night before for dinner, so I took the leftovers and sliced them up to put in the bento. You can add any protein to the bento, though. Tiny chicken wings are a popular thing to throw in, too! I also sliced up some carrots into mini carrots. I was originally planning to put green "stalks" onto the carrots using broccoli, but I had run out of time...! If you like, you can also divide the meat and vegetables using a piece of wax paper.
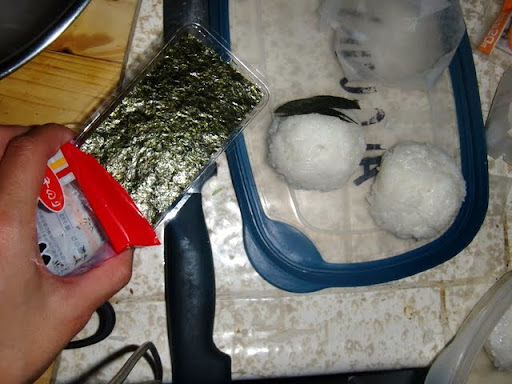
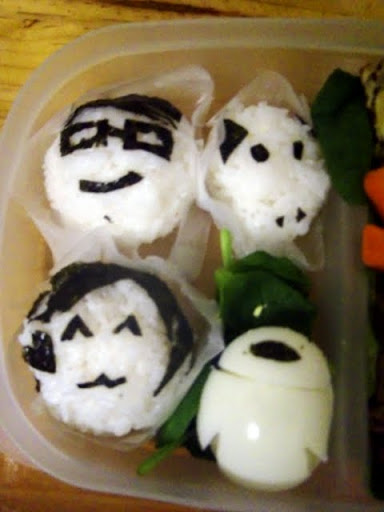
4) For the left side, I made some round onigiri to decorate. Onigiri rice is simply regular white rice, cooled, and mixed with a dash of salt, and some rice vinegar. I've seen onigiri rice prepared several different ways in my time in Japan, so pick the kind you like the best :) I mixed the rice up, then dipped my hands in a bowl of water so the rice wouldn't stick to them as I grabbed the rice. Next, I grabbed a fistful of rice and packed it into a small ball. I made 3 to make our "family." I decorated the onirigi using dry seaweed that I cut up using plain kitchen scissors (make sure they are dry!) I made an onigiri tha tlooked like Will, me, and our guinea pig, Niblet.
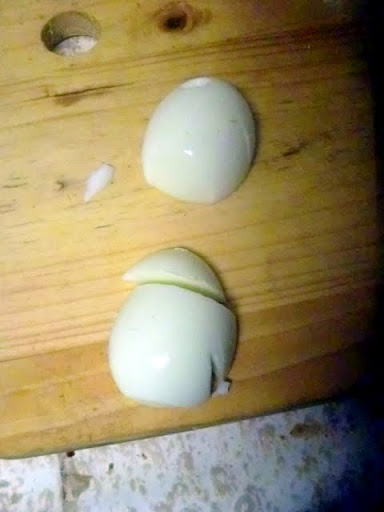
5) I had the bright idea to try to make a little EVA from Wall-E out of a hard boiled egg, haha. I saw it in this other bento, and threw it in at the last minute. I boiled an egg the night before and stuck it in the fridge over night. I took it out, and sliced off the top 3rd of the egg.Then I took little chunks out under each "arm", and added an oval onto the face. The oval is just a small piece of dry seaweed. I had to wet it a little bit to get it to stick to the egg. Sooooort of ghetto, but it's the AI in the AI NO BENTO that counts!
6) Here's a pic of the onigiri and egg together!
7) and that's it! I added another piece of waxpaper on top of the bento before I closed it up so that the stuff inside wouldn't roll around too much. I also gave Will a bottle of Kewpie Mayo for his birthday haha.
The end!
DIY: How to Breakfast! Baked Eggs with Bunny Toast
1) Get two ramekins, and put in about 1/2 a tblspoon of butter and 1 tablespoon of milk or cream in each/ put in the broiler and let melt. Take ramekins out of broiler. Then, place 2 eggs in each. If you're a ham lover, put in 2 pieces of lunch meat ham at the bottom of the ramekin before putting in the egg. Add a bit of salt and pepper.
2) Top the eggs with your choice of thyme, rosemary, oregano, cheese (I used mild cheddar), and lots of green onion. Place the ramekins back in the broiler for 15 to 25 minutes, until yolks are slightly firm
3) While ramekins are in the broiler, toast some bread. You can take any shape cookie cutter to make cute shapes once the toast is ready. I made some small bunny bread bites!
4) When eggs are done, take out of broiler, and let sit for 3 minutes. Place on a plate with the toast bites, and service! ta da!
DIY: 愛の弁当の作り方! How to Ai no Bento! (Love Bento!)
1) Steal flat-ish tupperware from roommate. Hope he doesn't notice. Line one side with lettuce or spinach. For the other side, I prepped "containers" for the onigiri using round pieces of wax paper that I taped the sides up of. You can also use cupcake papers for this, I was just too cheap to buy them hehe.
2) Prepare omelette: I made Japanese-style sweet omlettes, which is simply 1 egg, 1 tablespoon of dashi, and 2 teaspoons of sugar whipped up and put into a pan. Usually sweet omlettes are rolled, but to make shapes, I kept it flat. (Right around this time, the broiler had set off the fire alarm, so while I was running around trying to turn it off, the eggs has cooked flat anyway haha). When soft and firm, take out of pan and place on cutting board to let cool for about 3 minutes. Then, I used bunny bread press molds and pressed bunny and bear shapes into the omlette. (yours shouldn't be QUITE as burny as this one..)
3) I had grilled some beef tenderloin the night before for dinner, so I took the leftovers and sliced them up to put in the bento. You can add any protein to the bento, though. Tiny chicken wings are a popular thing to throw in, too! I also sliced up some carrots into mini carrots. I was originally planning to put green "stalks" onto the carrots using broccoli, but I had run out of time...! If you like, you can also divide the meat and vegetables using a piece of wax paper.
4) For the left side, I made some round onigiri to decorate. Onigiri rice is simply regular white rice, cooled, and mixed with a dash of salt, and some rice vinegar. I've seen onigiri rice prepared several different ways in my time in Japan, so pick the kind you like the best :) I mixed the rice up, then dipped my hands in a bowl of water so the rice wouldn't stick to them as I grabbed the rice. Next, I grabbed a fistful of rice and packed it into a small ball. I made 3 to make our "family." I decorated the onirigi using dry seaweed that I cut up using plain kitchen scissors (make sure they are dry!) I made an onigiri tha tlooked like Will, me, and our guinea pig, Niblet.
5) I had the bright idea to try to make a little EVA from Wall-E out of a hard boiled egg, haha. I saw it in this other bento, and threw it in at the last minute. I boiled an egg the night before and stuck it in the fridge over night. I took it out, and sliced off the top 3rd of the egg.Then I took little chunks out under each "arm", and added an oval onto the face. The oval is just a small piece of dry seaweed. I had to wet it a little bit to get it to stick to the egg. Sooooort of ghetto, but it's the AI in the AI NO BENTO that counts!
6) Here's a pic of the onigiri and egg together!
7) and that's it! I added another piece of waxpaper on top of the bento before I closed it up so that the stuff inside wouldn't roll around too much. I also gave Will a bottle of Kewpie Mayo for his birthday haha.
The end!

No comments:
Post a Comment